
Chess Endgames: 10 Must Know Patterns
The chess endgame is the phase of play where most of the pieces have left the board.
Although one may think that having fewer pieces remaining would make the game “simpler”, the opposite is true. Endgames can be the most complex part of chess.
Endgames are notoriously tricky, and many players dislike them. They find endgames technical and unglamorous. However, the endgame is where true chess expertise shines through. It is also where many games are decided, especially among advanced chess players.
The message is clear: if you want to improve your chess results, learn to love the endgame! In this article we show 10 of the most important endgame patterns you must know.
The Importance Of Chess Endgames
The chess endgame is extremely unforgiving. If we contrast mistakes made in the endgame with mistakes made in the opening and middlegame:
- Small inaccuracies in the opening and middlegame may leave your position slightly worse, but if you play well thereafter, you can often recover from them.
- The same “inaccuracies” in the endgame can change the result on the spot, turning a winning position into a drawn position - or even a lost position!
For this reason, chess endgames are very concrete. They require deep, accurate calculation.
It is helpful, when performing these calculations in the heat of battle, to have certain endgame patterns in mind - gained through prior study. Familiarity with these patterns helps form a coherent endgame strategy without needing to calculate everything from scratch.
If you have in mind which positions you need to aim for (or avoid), then your calculations will be much more efficient.
We now move on to the patterns themselves. We have omitted checkmates. Interested readers can check out our article on checkmate patterns here. This article shows ideas such as smothered mate and back rank mate.
Instead, this article is all about one of the main goals in the endgame, which is to aid (or defend) against a pawn’s ambitions to promote on the back rank.

The Library Imperial Collector Series Luxury Chess Pieces - 3.0" King

DGT 3000 Digital Chess Clock

US Chess Premium Chess Box
Pattern #1: Opposition In Pure Pawn Endgames
The foundation for all chess endgames is pure pawn endgames - as in, endgames where all other pieces have been traded, and only kings and pawns remain.
Every chess player needs to know how to defend a position such as the one shown below, with White to move. Black’s pawn is trying to advance to the first rank, while White’s king is tasked with stopping it.
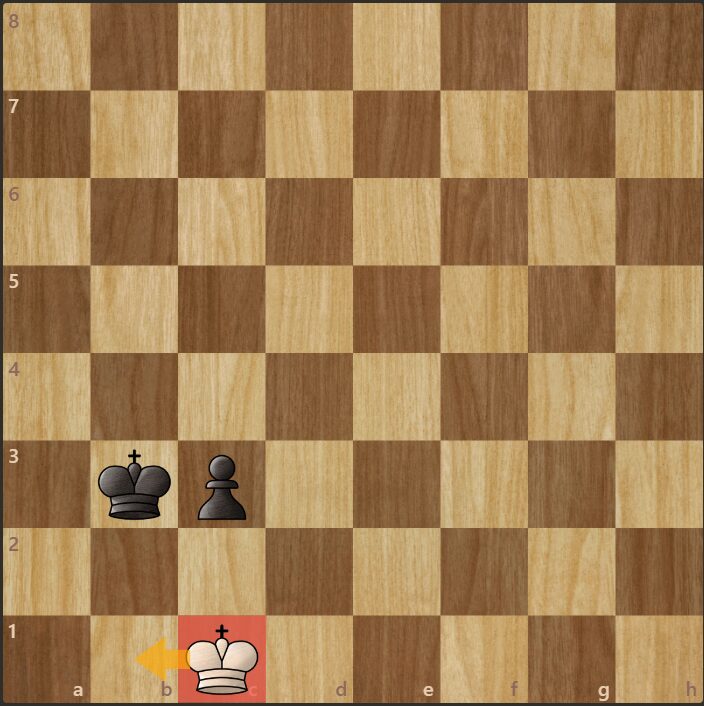
White needs to keep their king “in opposition” to the Black king by playing 1. Kb1! This move prevents the Black king from reaching a square from where it could help the pawn promote.
Opposition exists when the kings are an odd number of squares away from each other on the same file (i.e. one square, three squares, or five squares).
One square of opposition is the easiest to recognize, but three squares and five squares (known as distant opposition) are also vital - and often overlooked!
In the next position, White must recognize the need to take distant opposition. The only move to hold the draw is the (somewhat counterintuitive) 1. Kb1!. Those with less endgame experience may instead move their king closer to the enemy pawn with a move such as 1. Kb2?? or 1. Kc2?? - but both of those moves would allow Black to gain a winning position!
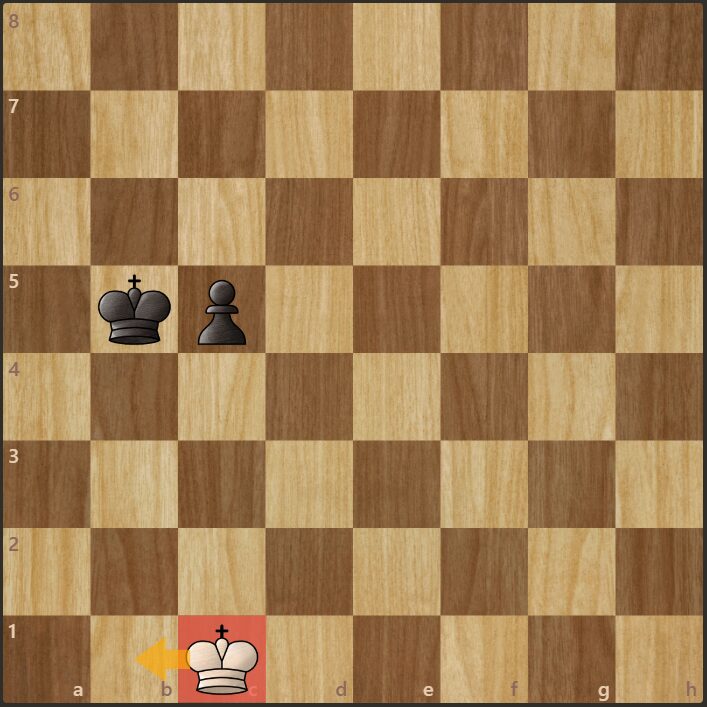
The move 1. Kb1! is the only move that keeps the White king exactly three squares away from the Black king - thus maintaining distant opposition.
Pattern #2: Key Squares In Pawn Endgames
The side with a king and a pawn (versus a lone king) can promote the pawn if the strong side’s king is able to reach one of the key squares.
These key squares change depending on whether the pawn is yet to cross halfway (i.e. the line separating the fourth and fifth rank), or if it has already passed the halfway mark.
If the pawn is yet to pass halfway, then the key squares are two ranks ahead of the pawn, forming a “long T” shape. These squares are highlighted in the next diagram. White can play 1. Kc6! and reach one of the key squares. With proper technique, White should be able to convert this into a win.

If the pawn has already passed halfway, then the key squares are instead one rank ahead of the pawn - a “short T”. In the next position, White can play 1. Kd6! and thereby reach one of the key squares.

Pattern #3: Target Squares Against A Rook Pawn
If the pawn is on the rook’s file (i.e., the a-file or the h-file), then the weak side has better drawing chances than if the pawn were on one of the six central files.
To prevent promotion, the weak side’s king must reach one of the highlighted squares before the pawn gets too close to promotion (in this case, the White king must get there before the Black pawn reaches a3).
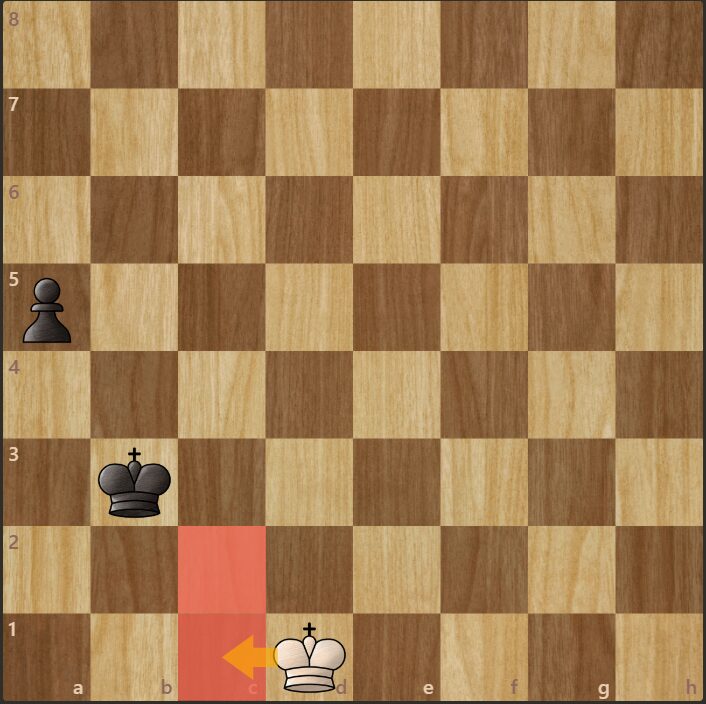
The equivalent defensive squares if Black had a pawn on the h-file would be f1 and f2.
With White to move, White is just in time to play 1. Kc1! thereby reaching one of the highlighted squares. Black will be unable to promote the pawn. The game should eventually end in a draw.
The strong side, therefore, has to prevent the enemy king from reaching those defensive squares! In the same position but with Black to move, then Black could secure victory via 1. …Kb2! to box out the White king from the squares it needs to reach.
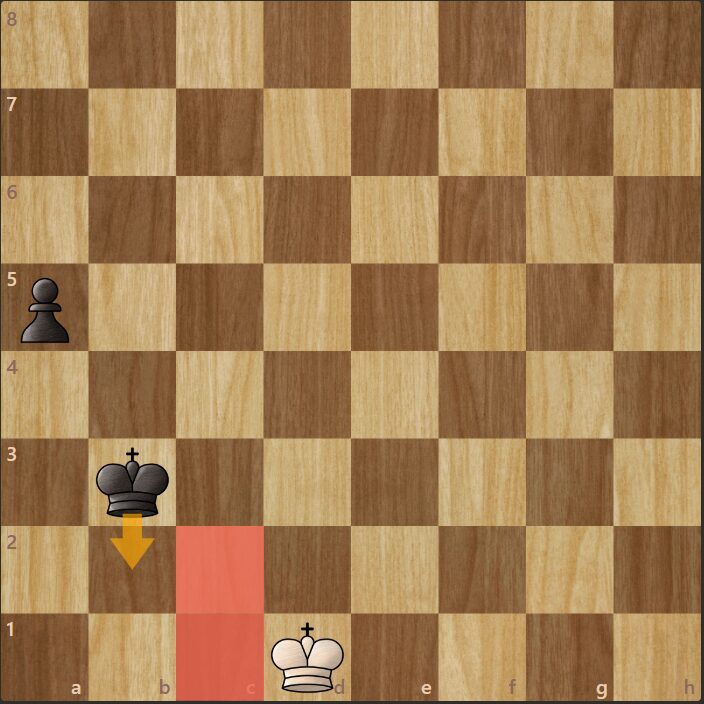
This illustrates how important a single tempo can be in chess endgames!

The Cooke Series Luxury Chess Pieces - 3.6" King

The Large Ultimate Chess Bag

The House of Staunton Electronic Sensory Chess Board (E-Board) - With LEDs
Pattern #4: Decoy Pawn
It is also essential to know what to do when there are more pawns on the board.
White has an extra pawn in the position below. The winning technique involves two phases:
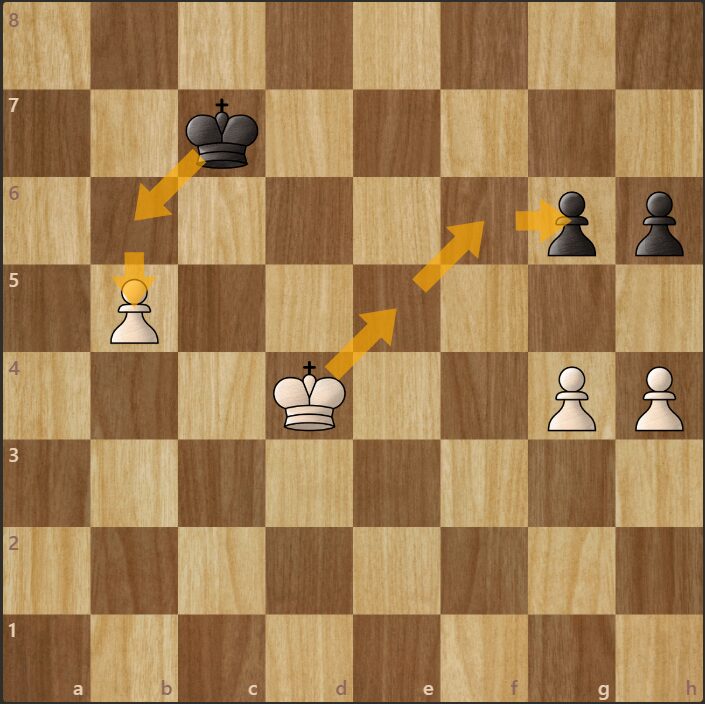
First, White should create a passed pawn on the wing where White has the majority - starting with 1. b5!

Then, after 1. …axb5, 2. axb5 White will use the b-pawn as a sacrificial decoy. While the Black king spends time capturing the b-pawn, White’s king will march over to the kingside to win Black’s remaining pawns, with an easy win to White to follow.
The following diagram illustrates this plan in action.
Pattern #5: Sacrifice To Create A Passed Pawn
Passed pawns are often decisive in chess endgames. The early 20th-century master player and author Aron Nimzowitsch once wrote: “A passed pawn is a criminal which should be kept under lock and key!”
It can be worth sacrificing material to gain a passed pawn. The next example is a case in point.
White can play 1. g5! Through this pawn sacrifice, White forces the creation of a passed pawn on the kingside. Black’s king is too far away to stop it.
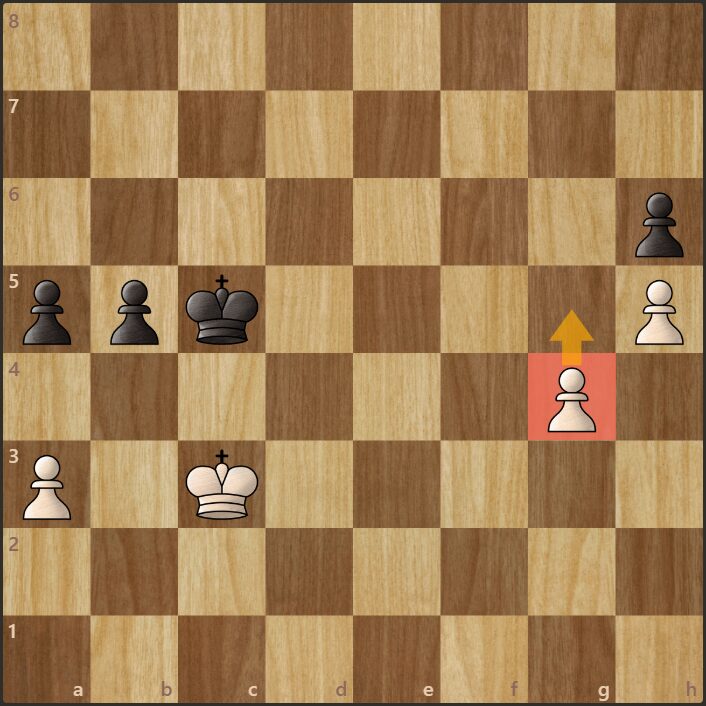
Black is left with no good options. Black cannot really decline the sacrifice, for 2. gxh6 would follow. But if Black accepts the sacrifice via 1. …hxg5, then White will follow up with 2. h6 and soon promote the h-pawn. White’s h-pawn is faster to promote than Black’s g-pawn.

Pattern #6: Wrong Rook Pawn
A bishop and pawn should be easily winning against a lone king, right?
Normally, yes - but there is one exception: the so-called “wrong rook pawn” chess endgame. This is where the pawn is on the rook’s file (i.e. the a-file or the h-file), and the bishop is the opposite color to the pawn’s promotion square. If the weak side’s king can reach the corner, then the bishop will be unable to dislodge it.
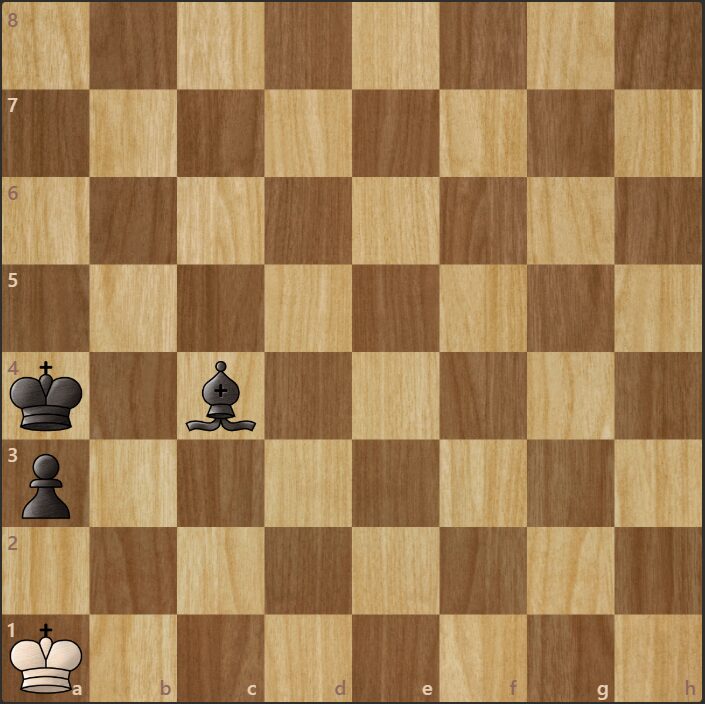
Despite Black’s material advantage, Black cannot make progress. The White king is well-placed in the corner and will simply stay there, shuffling between a1 and b1. If Black attempts to take the b1 square, a stalemate may arise.
Note that if Black instead possessed a dark-squared bishop (matching the color of the a1 square, which the Black pawn must promote on), then the position would be winning for Black. It is the fact that Black has the wrong-colored bishop that makes this position drawn.
Pattern #7: Overloaded Bishop
A bishop cannot defend two pawns with wide separation.
In the below diagram, White’s pawns are advancing and both kings are out of the action. Black must try to use their bishop to stop the White pawns.

However, the Black bishop will be unable to do so. After 1. f6 Kb4 (Black has nothing better) 2. f7 Kb5, 3. b7, Black’s position is manifestly hopeless. The bishop will be forced to give itself up for one of the White pawns, while the other pawn will promote to a queen.

For example, the game could continue 3. …Ka6 4. b8=Q Bxb8 5. f8=Q. With a queen against a bishop, White should win.
Pattern #8: Rook Blocking Its Own Pawn
Ideally, a rook should support its own pawn’s advance from behind so as not to obstruct the pawn from forging ahead. However, the circumstances of a game can commonly lead to a rook blocking its own pawn’s promotion path.
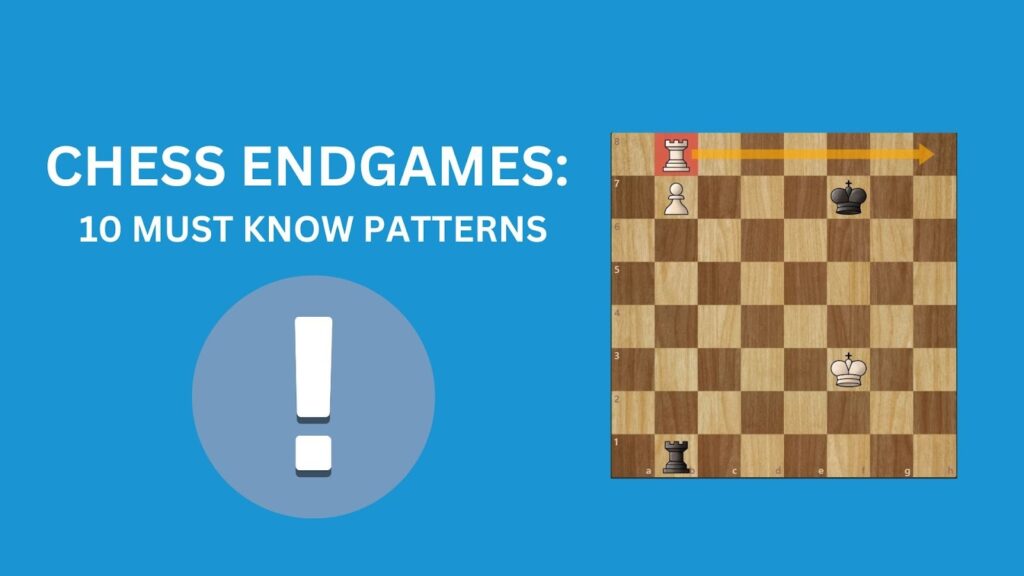
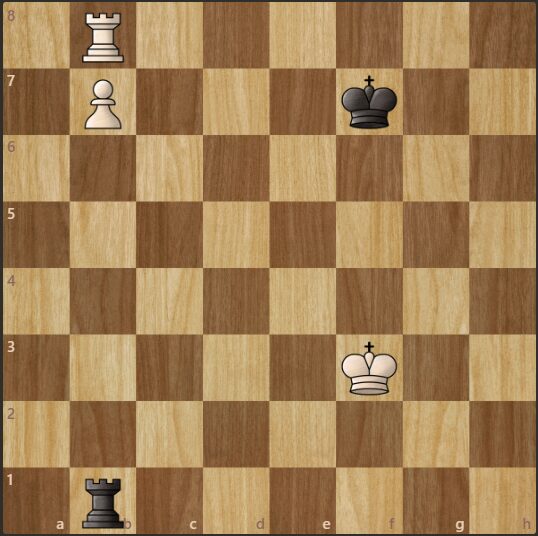
Take the following position, with White to move. White’s pawn is just one square away from queening, but White’s rook is stuck on defensive duties. If the White rook were to move away from b8 to enable the pawn to advance then the Black rook would capture the pawn next move.
However, White has a trick - and one that is well worth remembering.
After White plays 1. Rh8! Black is lost.
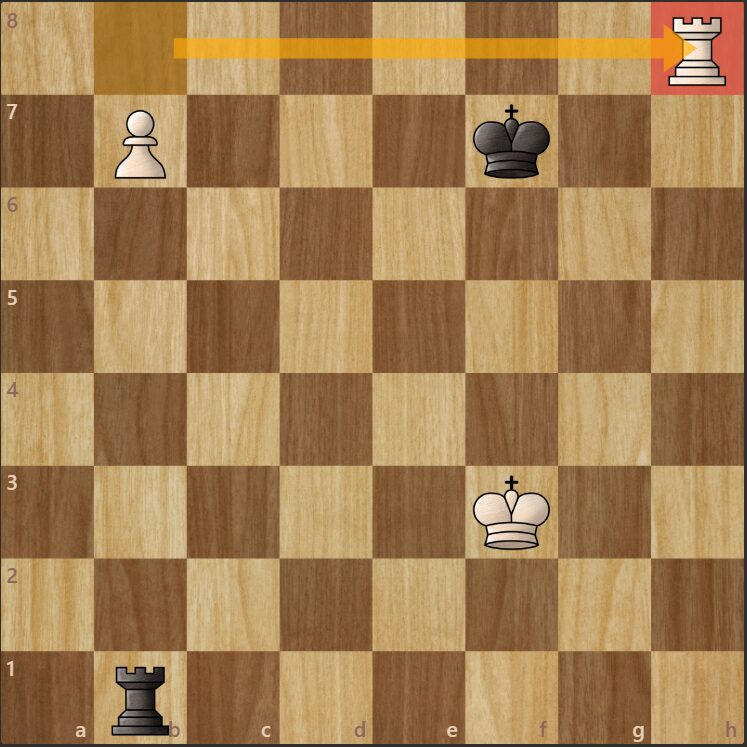
If Black’s rook were to capture the pawn with 1. …Rxb7, then White would be able to skewer the Black king and rook via 2. Rh7+. If, however, Black fails to capture the pawn, then the pawn will promote on the next move. Either way, White wins.
This technique works when the enemy king is on the 7th rank. However, if the defending king were elsewhere - such as on the f5 square, then a check from the rook would secure the pawn’s promotion.
Pattern #9: Lucena Position
When the strong side’s king blocks the promotion square, there is a specific way to extract the king and allow the pawn to promote. It is, however, very difficult to discover this method if you have not previously studied it.
Related: Master Unbalanced Chess Endgames.

The technique involves moving the White rook to the fourth rank to provide an eventual shield for the king from the Black rook’s rear checks. 1. Re4! begins the maneuver. The goal is to eventually reach a position such as that shown below, where the White rook blocks the Black rook’s checks from the rear, enabling the White pawn to promote on the next move.

Pattern #10: Philidor Position
This is another rook and pawn versus rook endgame. This time, the goal is to hold the draw with the weak side.
Things look difficult for White in the below position. The Black pawn is advancing, and the White king is stuck on the first rank due to the Black rook occupying the second rank.

However, the White king is actually well-placed, and with careful play, White can draw.
It is quite easy - but only if you know how! If White were to give a check via 1. Re8+?? (a natural move that many would play). Then Black could infiltrate via 1. …Kd3! threatening checkmate. White doesn’t have any more good checks, and Black should be able to shepherd their pawn through to queendom.
Instead, White should set up the Philidor Position - also known as the Third Rank Defense. White can do so with 1. Rb3!

The point behind this is to deny the Black king access to the third rank - which, as we saw, is Black’s best winning attempt.
White should keep their rook on the third rank - unless Black ever advances their pawn to the third rank. In this case, the White rook should return to the eighth rank to begin giving rear checks. The point is that, once Black has a pawn on d3, the Black king cannot use that square as cover from the White rook.
It is worth practicing several variations of the Philidor Position against the computer to make sure you know how to hold the draw. This situation is certainly likely to come up at some point in an important tournament game!
Related: Tips To Improve Your Game Using Electronic Chess Games.

The Collector II Series Luxury Chess Pieces - 4.0" King

The Millennium King Competition Chess Computer
Next Steps
This article has provided ten of the most useful chess endgame patterns. If you commit these to memory, you should soon find a game where you can employ at least one of them to improve your results!
However, chess endgames go far deeper than what this article has been able to cover. Entire books have been written about the endgame. Mastering this aspect of chess takes time and consistent practice.
If you want to further improve your chess endgame skills, we have a book recommendation for you: Jesus de la Villa’s 100 Endgames You Must Know.
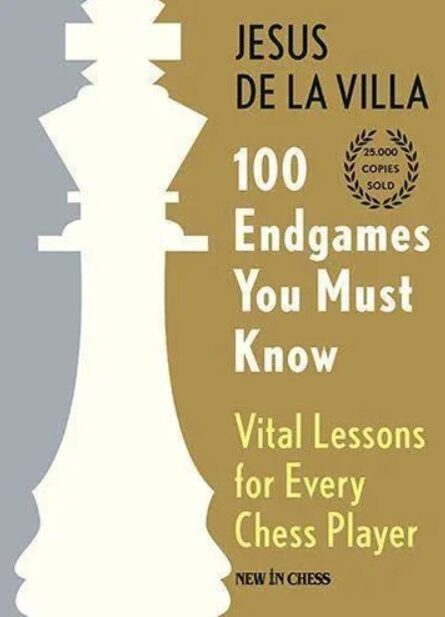
Jesus de la Villa’s book stands out for making the endgame clear and interesting. The patterns are arranged into chapters according to the material on the board. Then, each endgame is shown - with text explaining the concept and diagramed positions demonstrating it in action.
Here are some more endgame patterns you can look forward to learning about in this book:
- Drawing resources with a 7th-rank bishop’s pawn vs. a queen. (Ending 18)
- The Frontal Defense in a same-colored bishops endgame where one side has an extra pawn. (Ending 36)
- The Kling and Horwitz Technique in rook + pawn vs. rook endgames. (Ending 56)
Once you have been through this book, you will be earning many extra half points (and full points!) via your expert command of the endgame.
Frequently Asked Questions
There are countless possible chess endgames. Endgame positions differ from one game to the next. Subtle differences can completely alter the evaluation of the position. However, one notable book has attempted to identify 100 theoretical endgame patterns: Jesus de la Villa’s 100 Endgames You Must Know.
Two types of endgames stand out for their frequency in practice. The first is pure pawn endgames where all pieces have been traded, and only pawns remain. The second is rook and pawn endgames, where both sides have either one rook each or two rooks each, as well as some number of pawns. Because these two endgames occur most frequently, they deserve greater attention in endgame study.
Some say that the endgame begins when the queens are traded. However, positions that still have many pieces on the board (even if the queens are not among them) are still considered the middlegame by many. Perhaps a better definition of the endgame is the point at which the king can be activated safely - i.e. when enough pieces have left the board that the king is able to join the fray without being in grave danger of coming under enemy fire.
A chess game can end in a win for one player via checkmate, resignation, or a timeout. The game can also end in a draw by agreement, stalemate, the 50-move rule, threefold repetition, or insufficient mating material.