How To Play Against The London System
The London System is one of the most notorious chess openings in the book. Rock solid, predictable, and tough to break down, it often leads to grueling games where White grinds out a slow and painful positional advantage. Well, it’s time to change all that!
While the London System is highly versatile, there are some lesser-known lines that boast an impressive track record for Black. The unnamed variation that we’re going to share with you not only works brilliantly at the club level, but it garners fantastic win rates against grandmasters too!
With plenty of tricks and traps in store, this guide might just turn the London from your most hated to your favorite opening to play against.
The Biggest Weakness of the London System
What's the greatest strength of the London System? It’s predictable. White can play almost the same moves regardless of Black's response. It’s great for beginners or chess players who don’t wish to learn too much opening theory.
What's the greatest weakness of the London System? It’s predictable! If you can pinpoint the weaknesses in White’s setup, you can plan some provocative, powerful ways to dismantle it. White may be tempted to play inferior moves just to maintain familiar territory. The variation we'll share here is a prime example.

The Library Collection - The Anderssen Dropjaw Series Luxury Chess Pieces - 3'' King

Millennium eONE Electronic Chess Board for playing on chess.com
Start With 1. d4 Nf6. 2. Bf4 c5
White can play the London System regardless of whether you respond to 1. d4 with 1...d5 (the Closed Game) or 1...Nf6 (The Indian Defense). There are, however, more dynamic, tactical options if you start with the latter. After 1. d4 Nf6, 2. Bf4, continue with 2...c5.

2…c5 immediately challenges White’s center. White is rightly reluctant to capture on c5 since you can usually win the pawn back. Chess engines indicate that White’s strongest move is 3. d5, but since that would depart from their familiar London System territory, very few play it.
Instead, the vast majority of opponents respond with 3. e3.
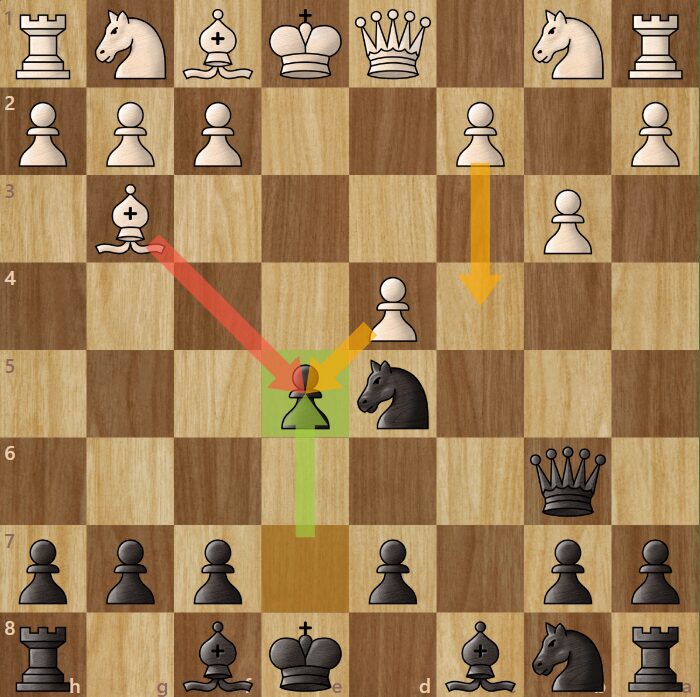
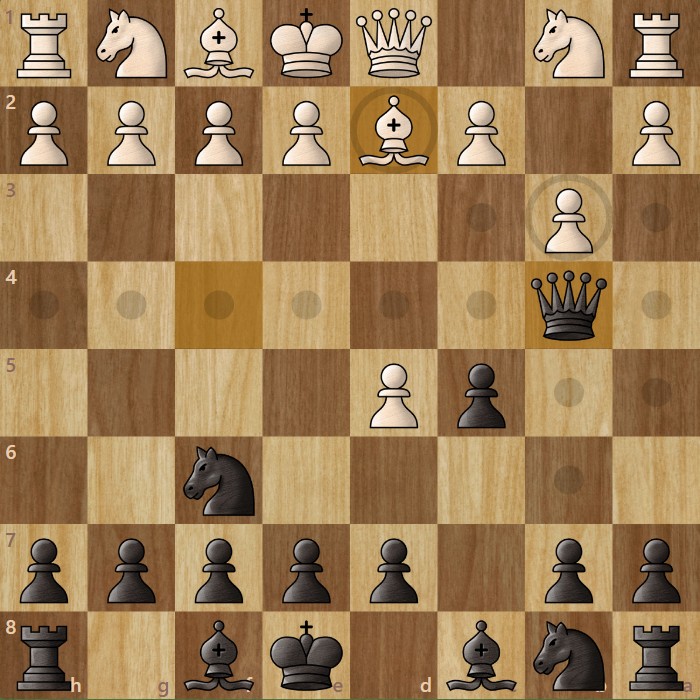
Your Key Move: 3...Nd5
Even in elite chess, few players seem to realize the power of the move 3...Nd5. This move pushes White’s bishop back to g3 and places the knight on a powerful central square where it can leap into an attack later down the line.
The table below shows just how powerful this sequence is at master level. In millions of amateur online games played on lichess.org, it also scores Black better than any other variation.
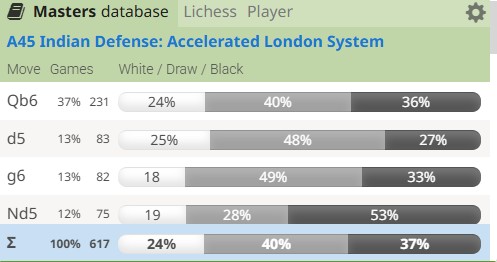
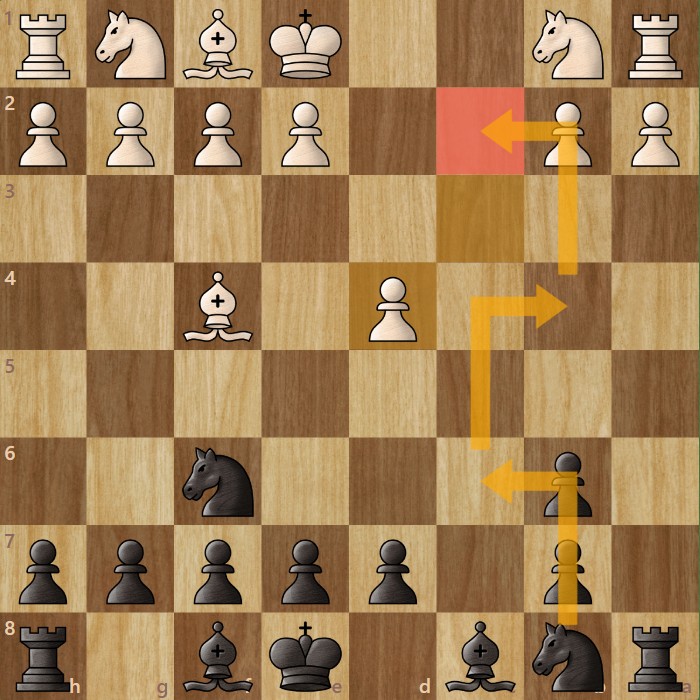
4. Bg3 Qb6
After 4. Bg3, continue with 4...Qb6, threatening White’s weak pawn on b2. Most amateur opponents respond with 5.b3. Notice how this immediately weakens the c3 square that your knight could move to later. Continue by trading pawns on d4.

Your Startling Gambit: 6...e5
While grandmasters tend to continue this variation with more solid moves like 6...g6 and 6...e6, we’re going to continue with a rare, aggressive variation that scores brilliantly even against the strongest club players.

DOWNLOAD - CHESSBASE '26 - Premium Package

The Millennium King Competition Chess Computer
On the face of things, 6...e5 looks like an odd sacrifice for Black. Indeed, if White plays perfectly, your opponent will enter the middle game with a slight advantage. Yet the staggering 63% win rate with this variation isn’t without good reason. There are just too many tactical maneuvers waiting to outsmart your London System opponents who were hoping for a quiet game!
7. Bxe5 – Dangerous for White
7. Bxe5 is White’s favorite response in online games, yet it frequently spells disaster because it leaves the e-file extremely vulnerable to attack. White is nowhere near castling, so if you castle quickly, you can swing your rook into a powerful attack. Continue with 7...Bb4+ and castling.
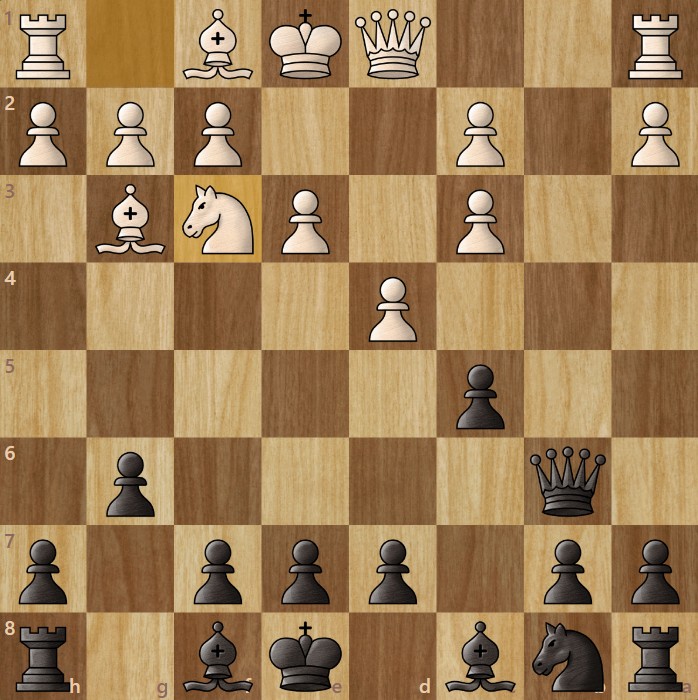
The following board diagram shows the typical line: 1. d4 Nf6 2. Bf4 c5 3. e3 Nd5 4. Bg3 Qb6 5. b3 cxd4 6. exd4 e5 7. Bxe5 Bb4+ 8. Nd2 O-O 9. Nf3 d6. Can you see why it's so devastating for White?
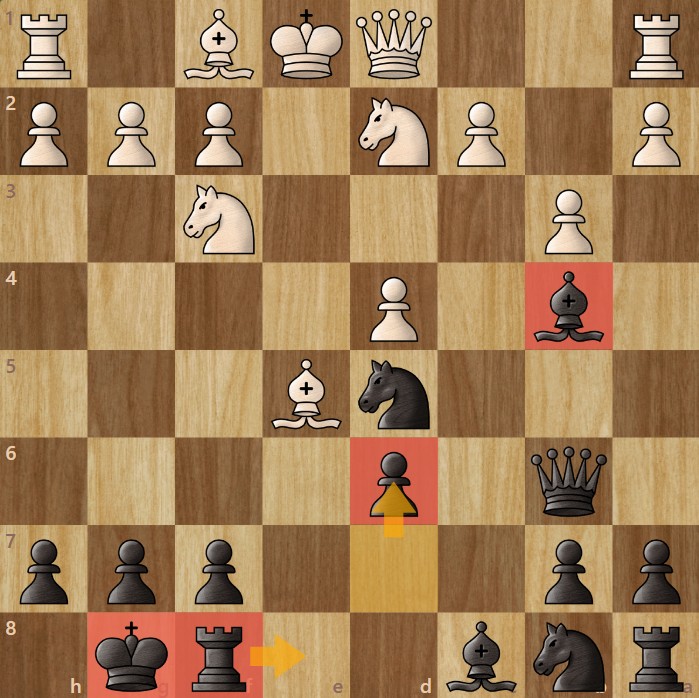
Answer: After White's bishop retreats, you can force 10...Re8+ 11. Be2. Now, you can play the move you've been waiting for—Nc3! This forks White's queen and bishop on e2. It's so fatal that chess engines recommend White sacrifice its queen!
7. c4 - Another Poor Choice
White’s second-favorite reply is 7. c4. It’s almost as bad. Continue with the same themes: 7...Bb4+ 8. Nd2 Nc3. Here, you attack White’s queen and follow up with 9...exd4, cementing your knight outpost as a stubborn fixture on the third rank.
If White continues without a forcing move, you can play Qe6+, once again attacking the very vulnerable e-file. This may look harmless at first glance, yet once again, the knight outpost makes this fatal for White. Just take a closer look at this sequence: 1. d4 Nf6 2. Bf4 c5 3. e3 Nd5 4. Bg3 Qb6 5. b3 cxd4 6. exd4 e5 7. c4 Bb4+ 8. Nd2 Nc3 9. Qc2 exd4 10. Ngf3 Qe6+

The *NEW* Austrian Coffeehouse Series Chess Pieces - 4.0" King

Premium Chess Box - Golden Heart

The Large Ultimate Chess Bag
7. dxe5 - White's Best Option
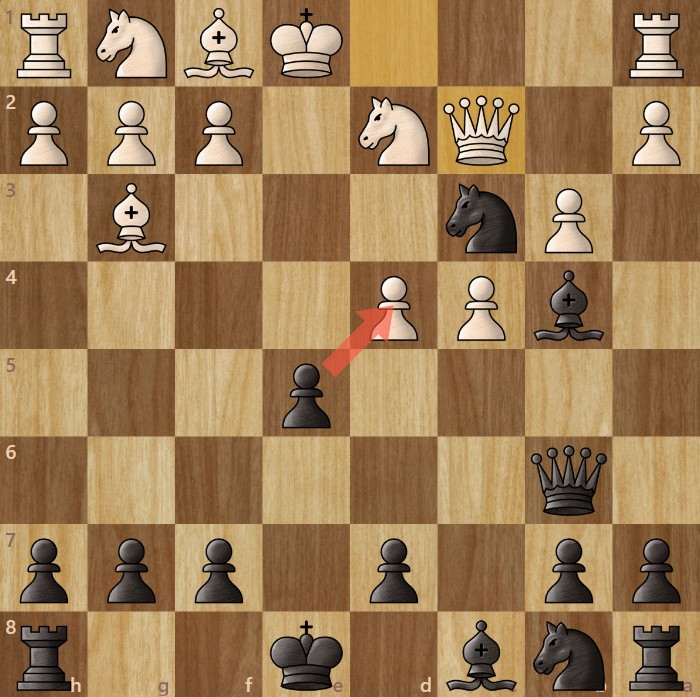
White's best move is 7. dxe5, yet it’s seldom played, and your opponent has not escaped danger yet! Unless White plays perfectly, you can still use the same tactical motifs to gain a strong attack. For example: 1. d4 Nf6 2. Bf4 c5 3. e3 Nd5 4. Bg3 Qb6 5. b3 cxd4 6. exd4 e5 7. dxe5 Bb4+ 8. Nd2 O-O 9. Nf3 Nc3

In this example, White has just played the natural-looking 9. Nf3, but it’s a weak move since it blocks White's queen from developing into a kingside attack. Now you can continue with your favorite moves. Firstly, 9…Nc3 to attack the queen and ...Re8 to follow soon after.
Note, you can also play...d5 after the knight has moved. This develops the light-squared bishop and controls key central squares. White had better not capture en passant since this would open the e-file!
Variation Recap: 1. d4 Nf6 2. Bf4 c5 3. e3 Nd5 4. Bg3 Qb6 5. b3 cxd4 6. exd4 e5
That may have seemed like quite a long sequence to remember. Let’s go back to consolidate and memorize it in four steps!
- First, remember the first four moves: 1. d4 Nf6 2. Bf4 c5 3. e3 Nd5 4. Bg3 Qb6
- After White answers 5. b3, trade pawns in the center before playing 6...e5.
- Whether White captures with the bishop or pawn or plays 7. c4, continue with 7...Bb4+, castling and attacking down the e-file.
- After White plays Nf3, look for chances to play Nc3. This is a very dangerous outpost from where your knight can wreak havoc—especially on e2.
Alternative Variations
Naturally, White may choose alternative moves to change the course of the opening.
5. Nc3 - More Traps Await!
After 4...Qb6, White’s strongest answer is not 5. b3, but 5. Nc3, challenging your central knight. Continue by trading knights and then playing 6...g6. White’s most natural-looking move now is 7. Nf3, but it’s problematic. Can you see your next cunning move?
1. d4 Nf6 2. Bf4 c5 3. e3 Nd5 4. Bg3 Qb6 5. Nc3 Nxc3 6. bxc3 g6 7. Nf3
Answer: 7...Qb2! Since White has committed its knight to f3, it is very difficult to defend c3. Chess engines recommend defending it with the king (8. Kd2)—yet most human opponents will struggle to fight the rest of the game with the king in the center of the board!
If White tries to save the pawn with 8. c4, simply continue with 8...Qc3+ 9. Nd2 Bg7, and then capture the pawn in the following moves (e.g., 1. d4 Nf6 2. Bf4 c5 3. e3 Nd5 4. Bg3 Qb6 5. Nc3 Nxc3 6. bxc3 g6 7. Nf3 Qb2 8. c4 Qc3+ 9. Nd2 Bg7 10. Bd3 cxd4).
3. c3 - A Swift Ticket to a Good Endgame
Instead of 3. e3, White may occasionally instead play 3. c3. In this case, continue with 3...Qb6. White’s favorite answer is 4. Qb3. Continue with 4...cxd4. 5. Qxb6 axb6 6. cxd4. From here, get your queenside knight to b4, where it can attack both c2 and a2.
Because the a-file is open, White cannot eliminate the attack with Na3. If they try, simply trade your rook for the knight and then land your rook-winning fork on c2.

The Library Imperial Collector Series Luxury Chess Pieces - 3.0" King

Luxe Premium Chess Box - Amboyna Burl

The House of Staunton DELUXE Tournament Bag
3. d5 - Out of the London System
Objectively, White’s strongest way to meet 2...c5 is to push its queen's pawn (3. d5). Most London players, however, are loath to do so, since this leads away from the system that they’re aiming for. Nonetheless, those comfortable with Benoni-like setups may still play 3. d5.
Continue with a central idea in many of the best anti-London systems: 3…Qb6. White now has several options, one of the most common being the weak move. 4. b3. Continue with 4...Qb4+. Black usually covers with 5. Bd2. Can you see your tactical ploy to win White’s central pawn?
Answer: 5...Qd4! Now, whether White covers its rook with its knight on the c-pawn, you can win d5.
How to Avoid the London System Altogether
The London System may be versatile, yet there is one way you can prevent White from playing it at all. In the Old Benoni Defense, Black answers 1. d4 with 1...c5, immediately challenging the most coveted pawn of the London System setup.

Since White’s only strong reply to the Old Benoni Defense is to push the pawn (2. d5), it immediately sabotages any hopes of a London System setup. Because this opening is rare, your opponent will likely find themselves in unfamiliar territory.
With a little study and practice, you will get to know this tricky chess opening better than White and have an excellent chance to gain an early advantage. The Old Benoni also frequently gives rise to the infamous Benko Gambit—one of Black’s most defiant and successful of all counters to queen’s pawn chess openings.
Our Verdict: The London System is Not Invincible!
The London System may be a stubborn setup against conventional play, yet there are lesser-known ways to dismantle it. By playing an aggressive variation like the lines we've suggested here, you’ll be taking your opponent out of their home turf onto a field strewn with tactical traps. It’s exactly the kind of game that London System players want to avoid!
We hope that you’re feeling inspired and excited by these courageous variations that have all the power to turn a typical, tepid London game into a sizzling off-piste adventure where you’ll not only come out on top but also have lots of fun doing so.