How To Checkmate: Patterns Everyone Should Know

Checkmate is the ultimate objective in chess: trapping the enemy king so that it has no legal squares to move to. In this article we look at how to checkmate - and in particular, some of the most common checkmating patterns.
The more checkmate patterns you know about, the more likely you are to spot them in your own games! Being aware of checkmating possibilities and seizing them when they arise will certainly make you a stronger player.
In this article, we:
- Explain what checkmate is (and how to checkmate).
- Give examples of some of the most important checkmate patterns.
- Provide further resources to help you further practice your checkmating skills.
Images from chess.com
What Is Checkmate In Chess?
“Checkmate” in chess (often called “mate”, for short) refers to a situation where a king is threatened with capture, and there is no way for it to escape from danger.
This differs from “check”, which is where the king is attacked but can parry the threat somehow - either by blocking, capturing the enemy piece, or moving to a safe square.
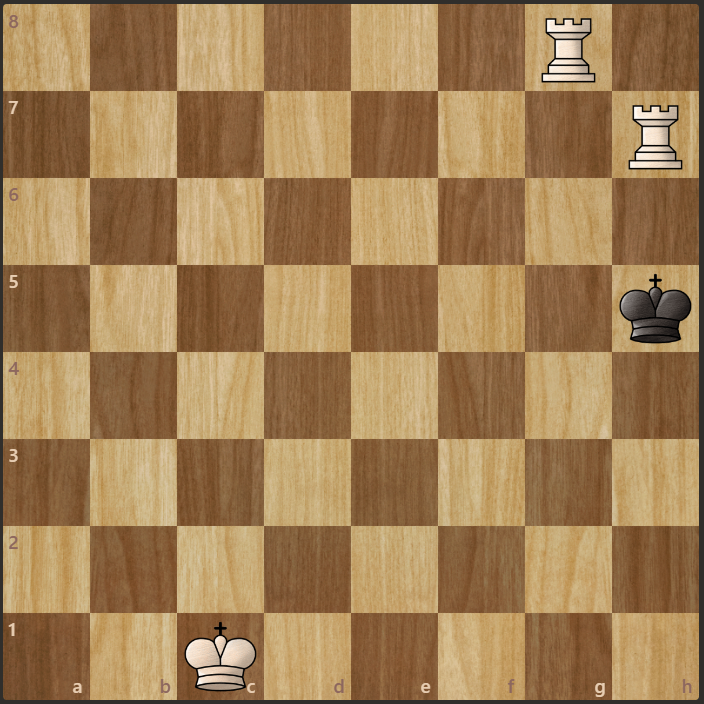
Here is a checkmate taken from a possible continuation of the game Alekhine vs. Yates, 1922. Black resigned first - but had Black continued playing, he could have found himself in the following position:
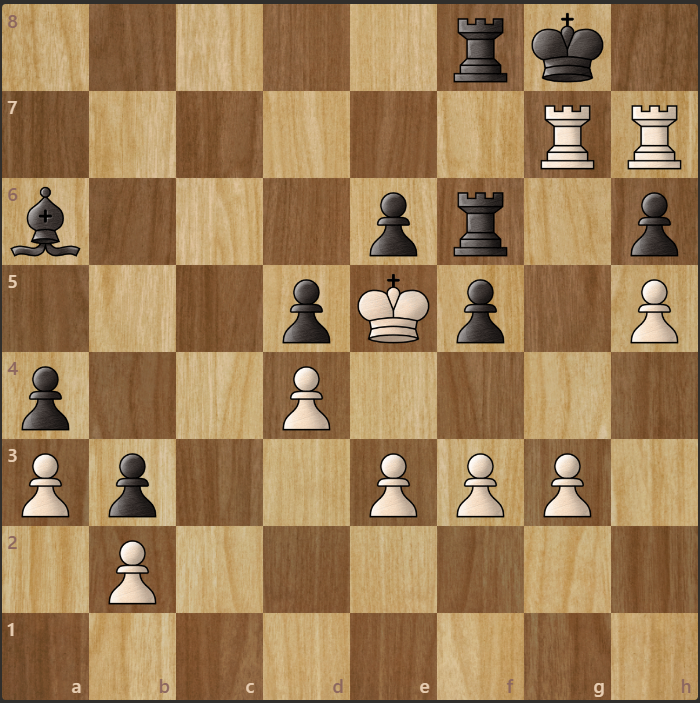
Black’s king is checkmated.
- It is currently attacked by the White rook from g7.
- Neither White rook can be captured by the Black king.
- The f7 and h8 squares are also impossible for the Black king to legally move to.
- Black’s own rook on f8 also removes a potential refuge square for the king.
Related: Learn from the best games of Alexander Alekhine’s brilliant chess career.
How To Get Better At Checkmating Your Opponent
Checkmate is a skill which can be learned like any other.
The more you practice it, the better you will get at it!
There are two main elements to becoming stronger at finding checkmate:
- Your ability to calculate - as in, visualizing the future position of the chess board. It is harder to see checkmate in four moves than it is to see checkmate in one move! Stronger opponents will rarely offer you simple checkmates, so your ability to calculate further becomes vital as you progress to higher levels.
- Your pattern recognition - before you can attempt to calculate checkmate, you must first recognize that it might be possible. Familiarity with various checkmating patterns is very helpful to building your intuitive feel for when it might be worth investing time to calculate a potential checkmate.
Related: Improve your chess pattern recognition with The Woodpecker Method.
The Checkmate Patterns You Need To Know
The rest of this article gives some of the most important checkmate patterns. We begin each entry with an example, and then show a position from a real game to help solidify the pattern in your mind.
Back-Rank Mate
This is one of the very first checkmates taught to beginners.
Either a rook or a queen can deliver a back-rank mate. The most elementary case is of a king trapped behind a wall of its own pawns, as shown below.
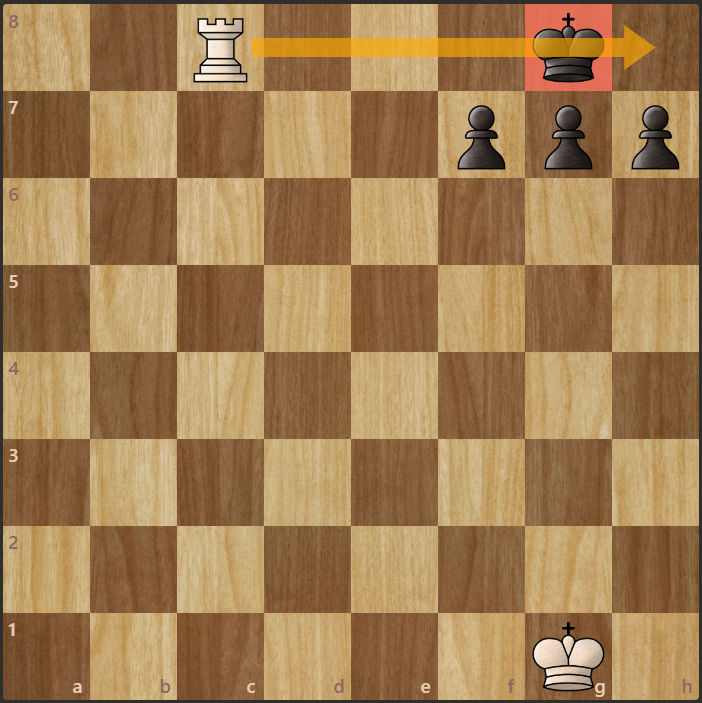
Black’s king is checkmated because its own pawns prevent it from moving away from the White rook’s attack.
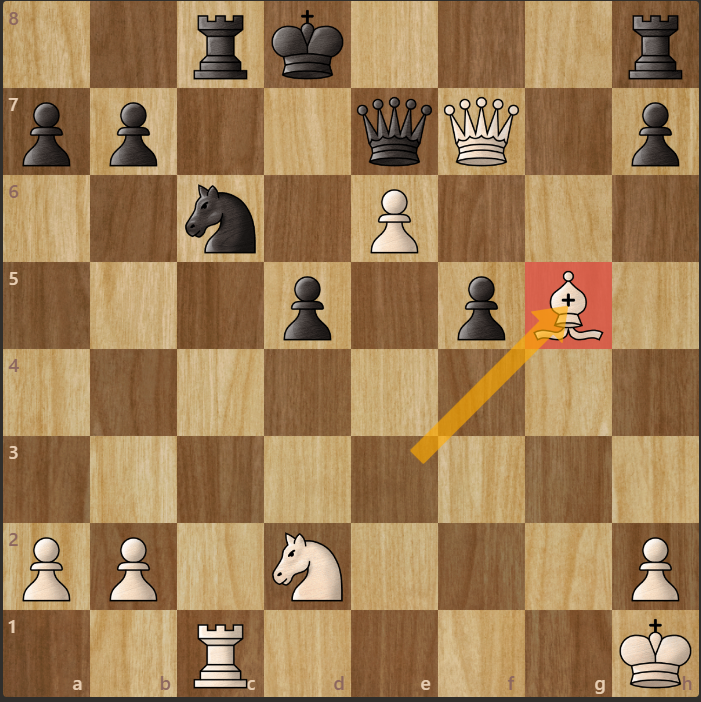
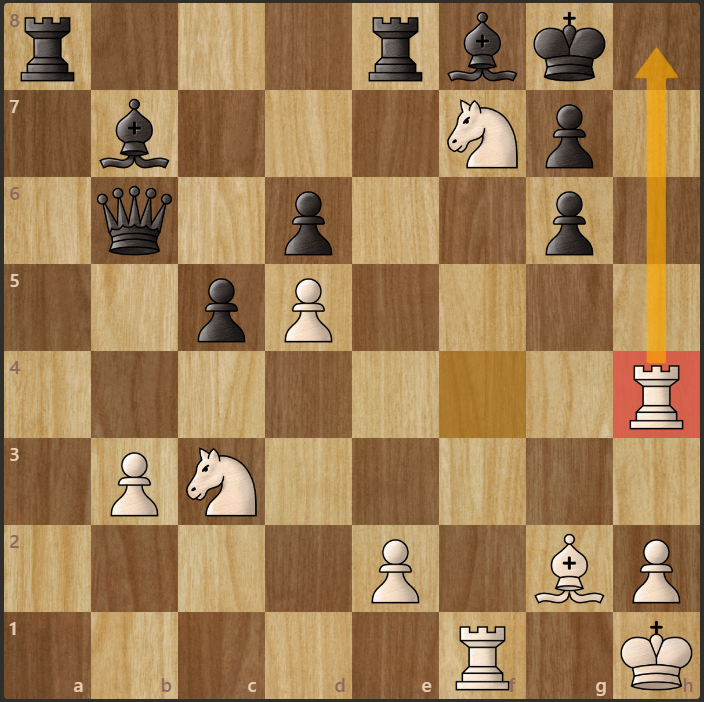
Other pieces can also block the king’s escape in a back rank mate. Take a look at this position from Kamsky vs. Eljanov, 2009, with White to move:
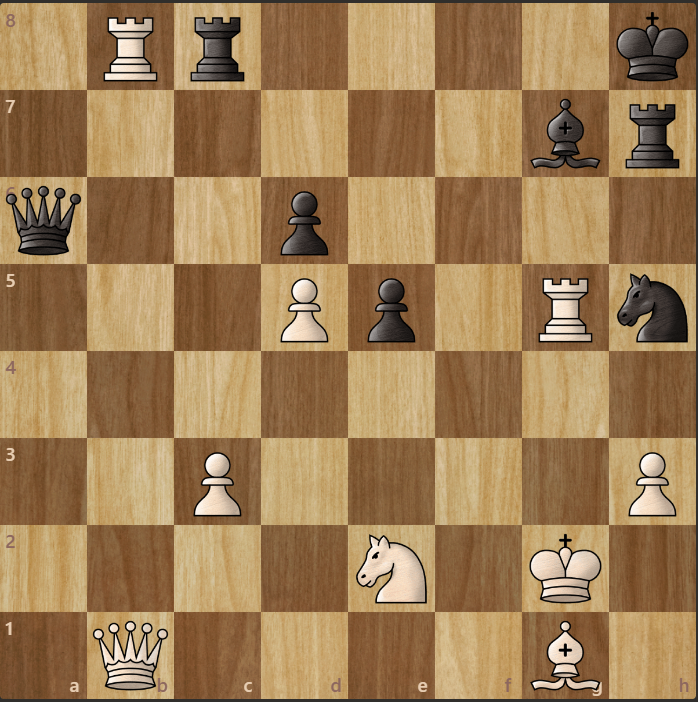
Eagle-eyed readers may notice that Black’s king is positioned in a way that means back-rank mate is in the air. The bishop on g7 and rook on h7 restrict the Black king’s movement. It is similar to how the pawns blocked their own king’s escape in the earlier example.
If White could play Rxc8+ without the Black queen being able to recapture, then Black would be quickly checkmated due to the back rank mate motif.
Noticing this, White played Qb5!
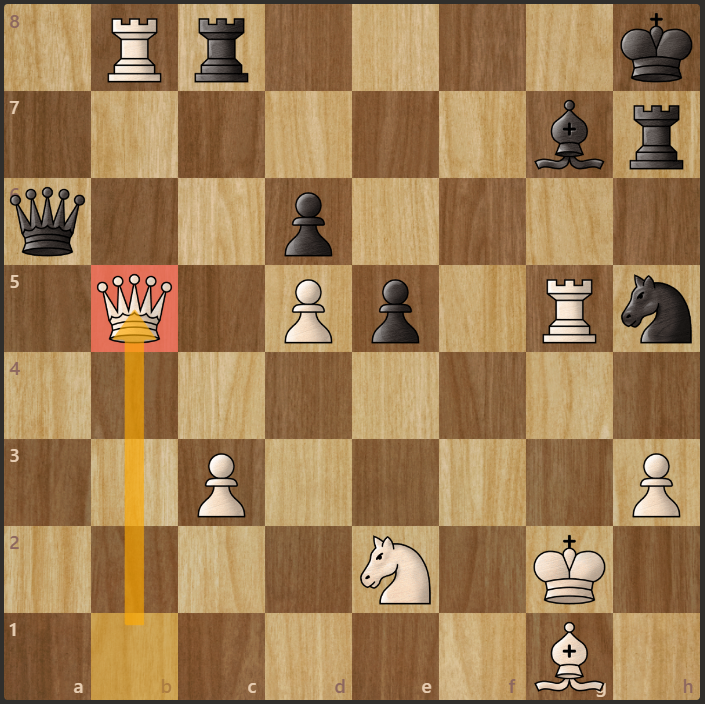
If Black’s queen stays where it is, then White’s queen will simply capture it next move - giving White a decisive material advantage. Black is unable to add a defender to the queen.
Due to White playing Qb5, Black’s queen is also unable to move somewhere safe that still guards the c8 square. In case of, for example, …Qxb5, then White would play Rxc8+ - with an inevitable back-rank mate to come. Understanding all of this, Black simply resigned.
Ladder Mate
This is one of the most straightforward ways to checkmate in an endgame where you enjoy an overwhelming material advantage.
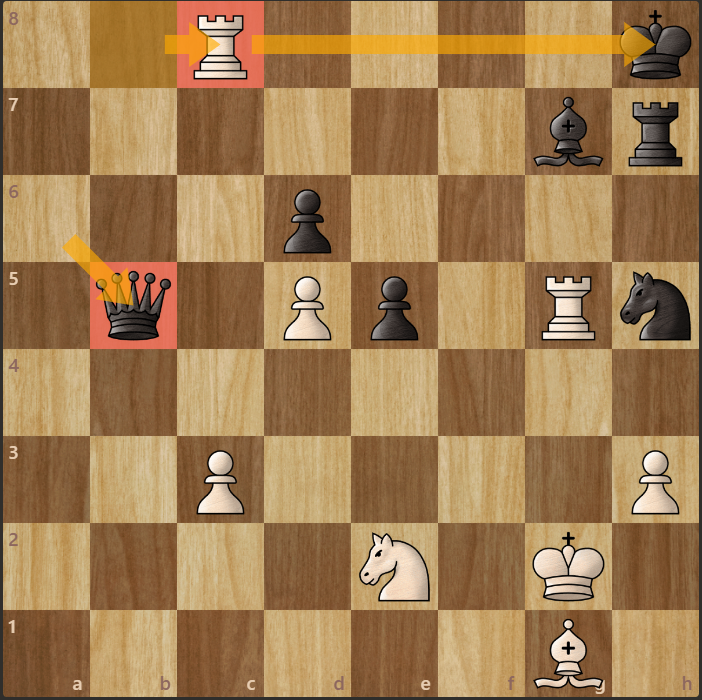
Simply get two rooks (or a rook and a queen, or two queens) and check the enemy king to the side of the board until it is has nowhere left to go, like shown below:
One White rook covers the g-file, while the other White rook covers the h-file. It’s checkmate!
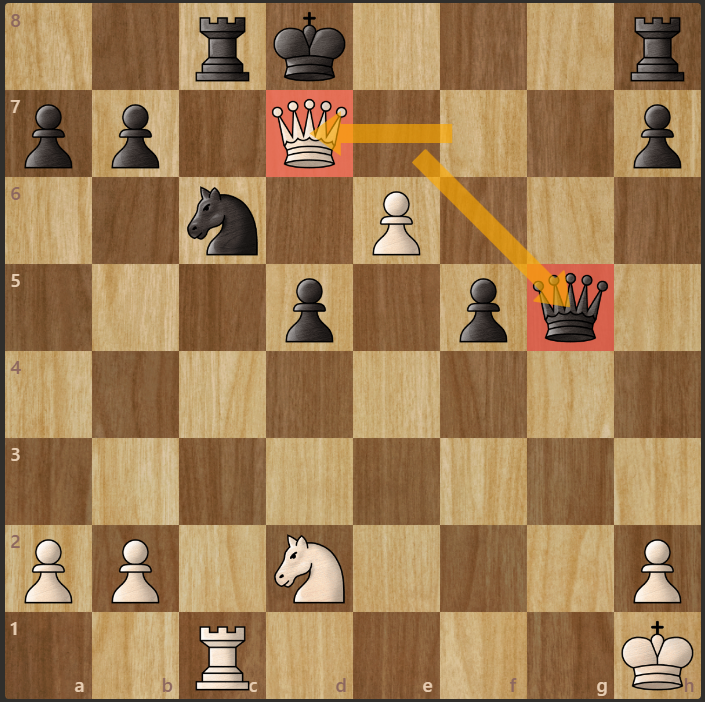
Any experienced chess player can easily perform the ladder checkmate in the endgame - but it can be more difficult to notice the same motif in the middlegame. The following position occurred in Ivanov vs. Gleck, 1984, with Black to move.
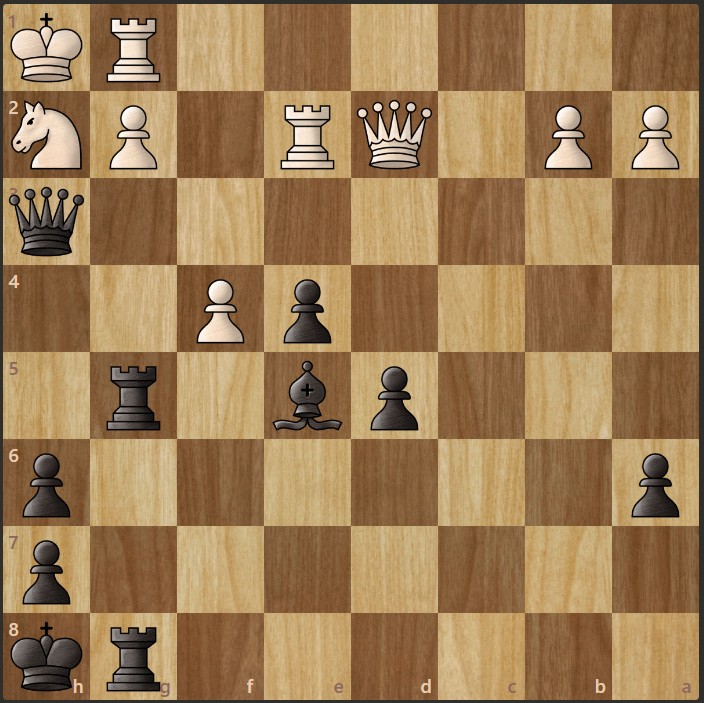
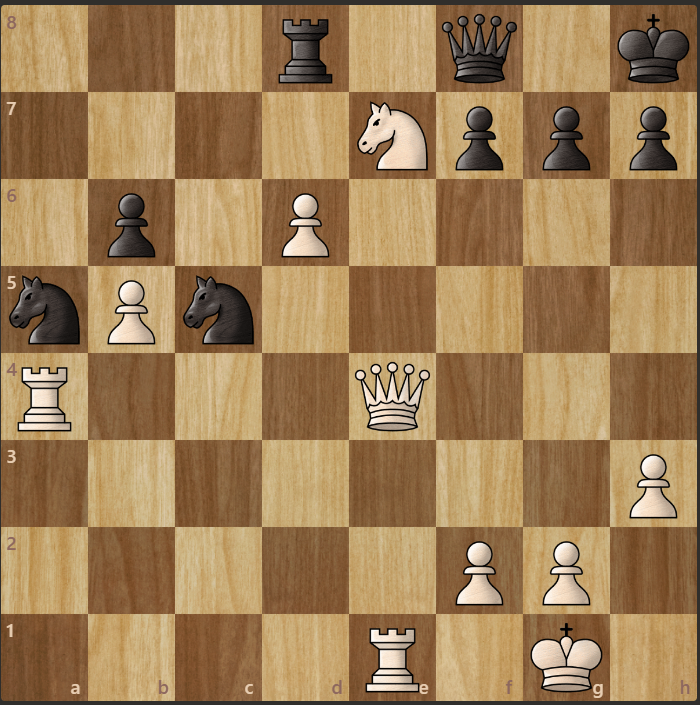
White is under pressure, but appears to have everything covered. Not only that, but his pawn on f4 forks two of Black’s pieces. Black’s queen is also under attack. It seems that White is winning material no matter what Black does.
So, White must have been shocked when Black made the stunning queen sacrifice: …Qxh2+!
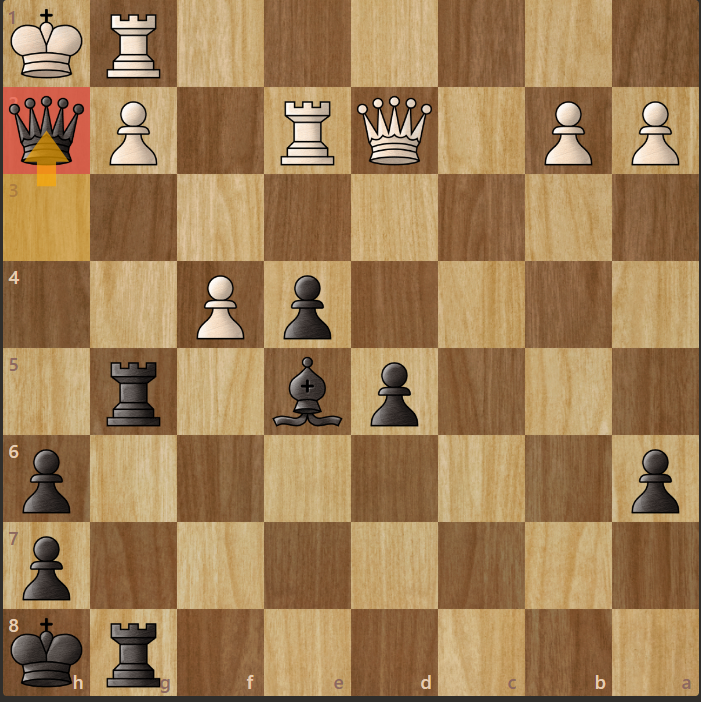
White resigned here. After the White king takes the queen (forced), Black’s follow-up …Rh5# is a ladder mate. White’s king is trapped by the two Black rooks controlling the h-file and g-file.

Related: Practice your checkmate calculation with 1001 Brilliant Ways To Checkmate, available from the USCF store.
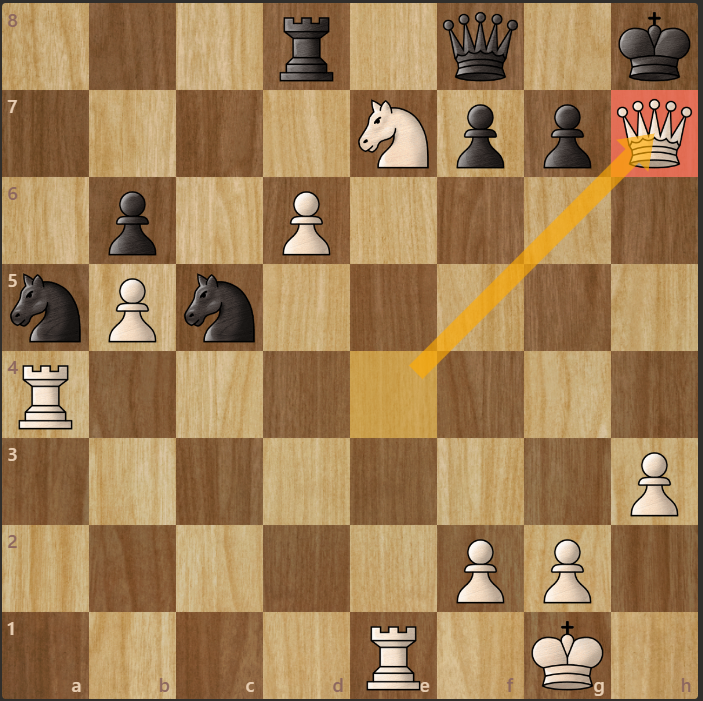
Kiss Of Death Mate
We have Grandmaster Simon Williams to thank for the name of this one! The idea behind the name is to describe the situation where a queen gets right up close to the opposing king to deliver a deadly “kiss” to her adversary.
The most powerful chess piece on the board is the queen, so it should come as no surprise that the queen features prominently in the most important checkmate patterns!
The famous Scholar’s Mate is one example of the kiss of death mate. Most beginners will have fallen victim to this at one point or another.
Strong opponents are not going to fall for the Scholar’s Mate - but they may be unable to stop the “kiss of death” under other circumstances!
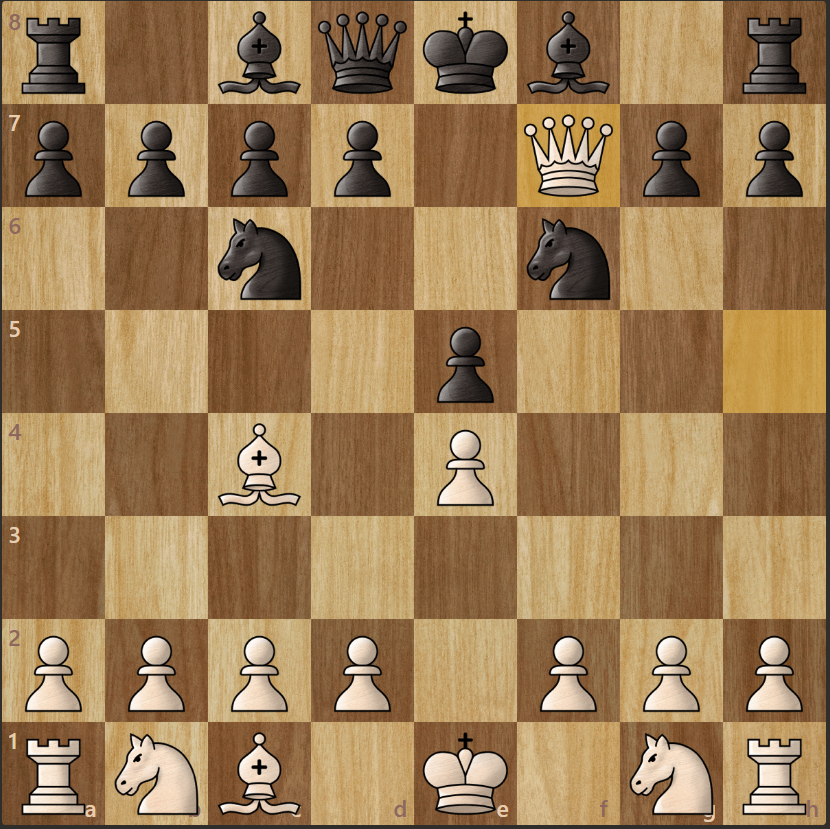
The below position occurred in Morphy vs. Perrin, 1857 with White to move.
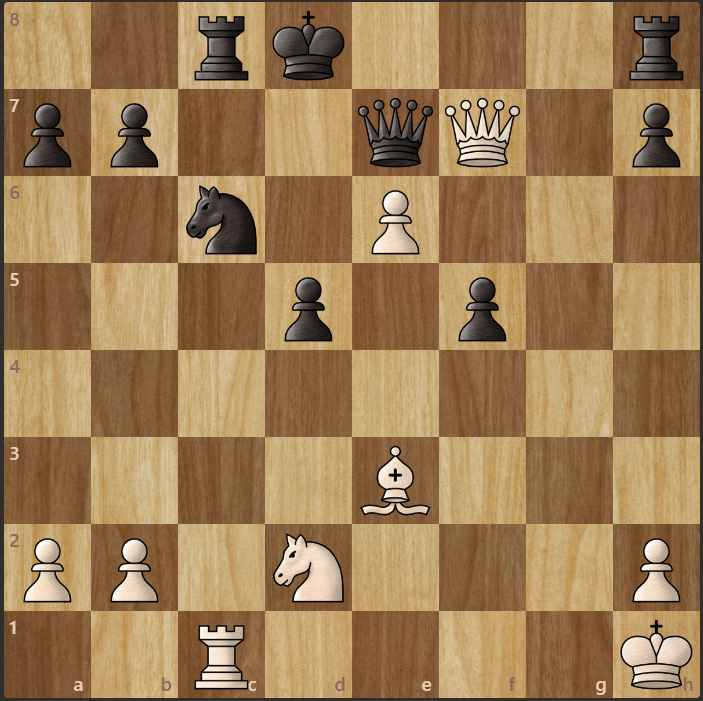
The great Paul Morphy combined the kiss of death checkmate pattern with another tactical motif: the pin.
Related: The Ultimate Guide To Chess Tactics
Morphy played Bg5! - a move which prompted Black to resign.
White’s bishop attacks the Black queen - so if Black does nothing, then he will lose the queen and be at an impossible material disadvantage. But if Black takes the bishop with …Qxg5, then White delivers the kiss of death mate next move with Qd7#.
Arabian Mate
The combination of rook and knight can be deadly to an opposing king.
The name “Arabian mate” comes from one of the oldest versions of chess, which was played in the Arabian Peninsula hundreds of years ago, long before chess as we know it was invented. Back then, the pieces we now think of as bishops and queens did not have the long-range movements that they do today. However, the rooks and knights still moved exactly the same way as they do in modern times.
-
-
 CLEARANCE - POWER PLAY - Checkmate Challenge - Essential Knowledge - Daniel King - VOLUME 26Special Price $15.00 Regular Price $33.95
 -
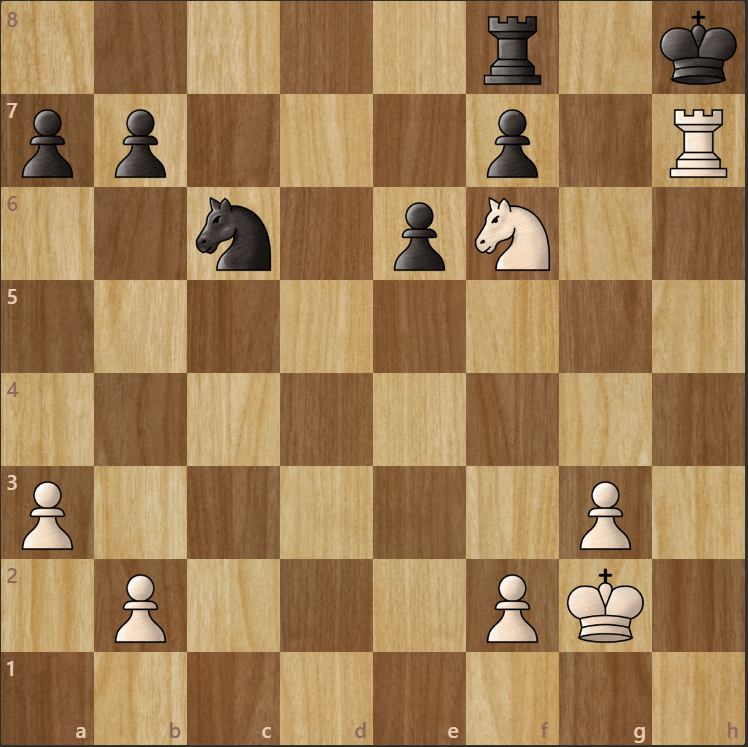
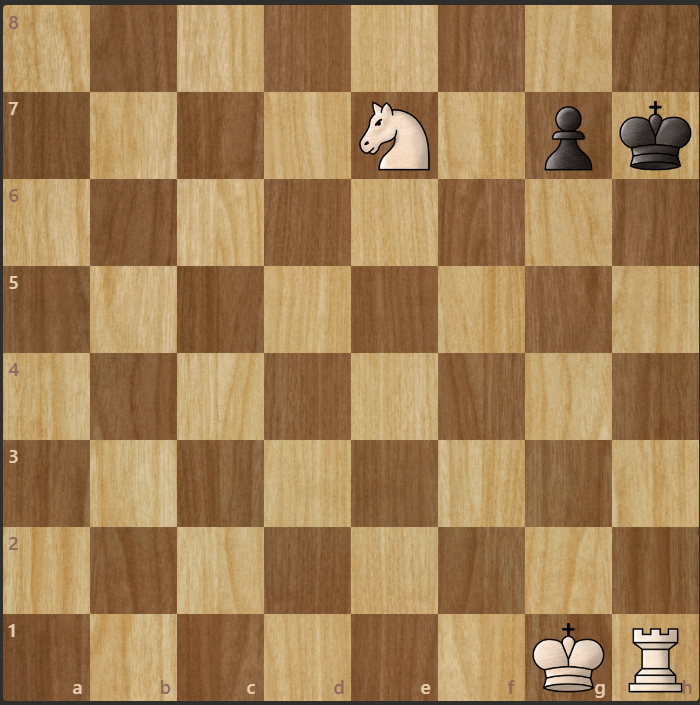
The below position shows one of the oldest checkmates in recorded literature. Notice how White’s knight not only defends the White rook, but also takes away the g8 square from the Black king. It’s checkmate!
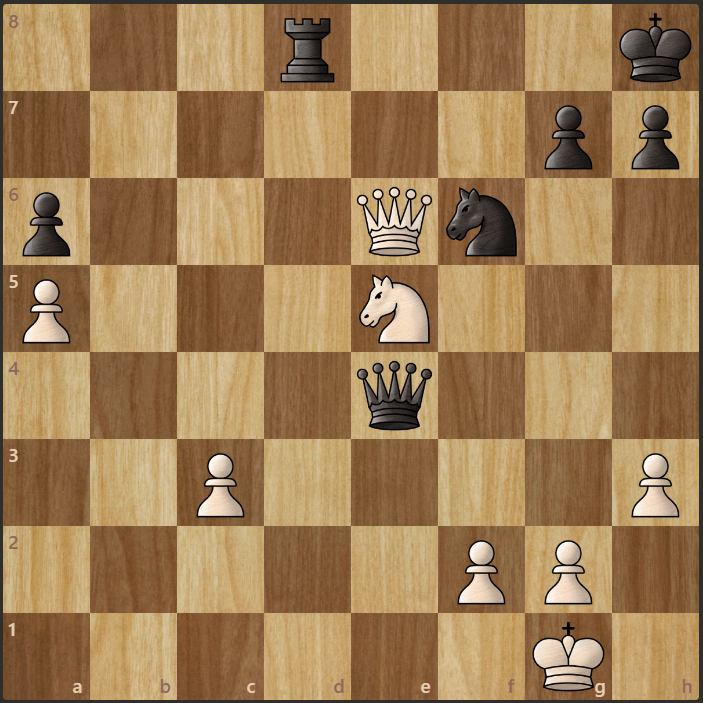
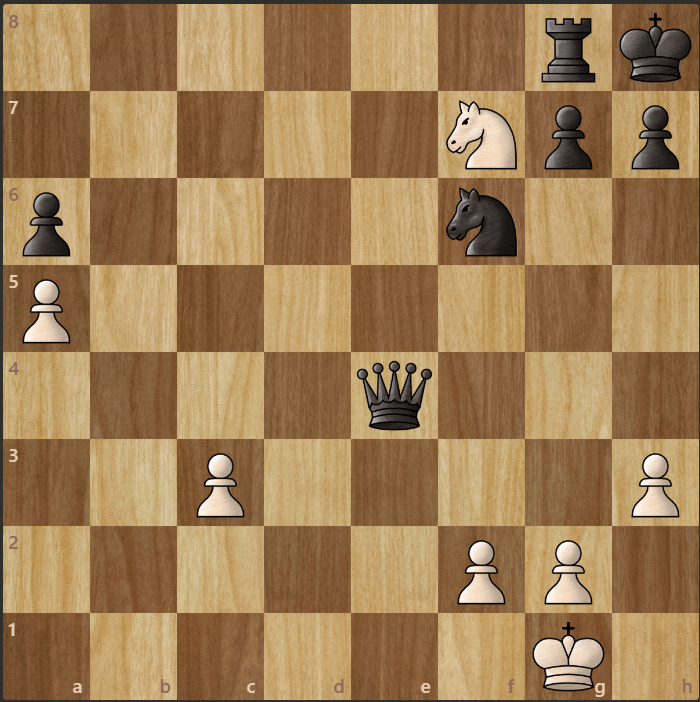
The Arabian mate has been delivered countless times in the centuries since then. One case where this checkmate pattern proved decisive was Karpov vs. Salov, 1993, where the following position was reached with White to move:
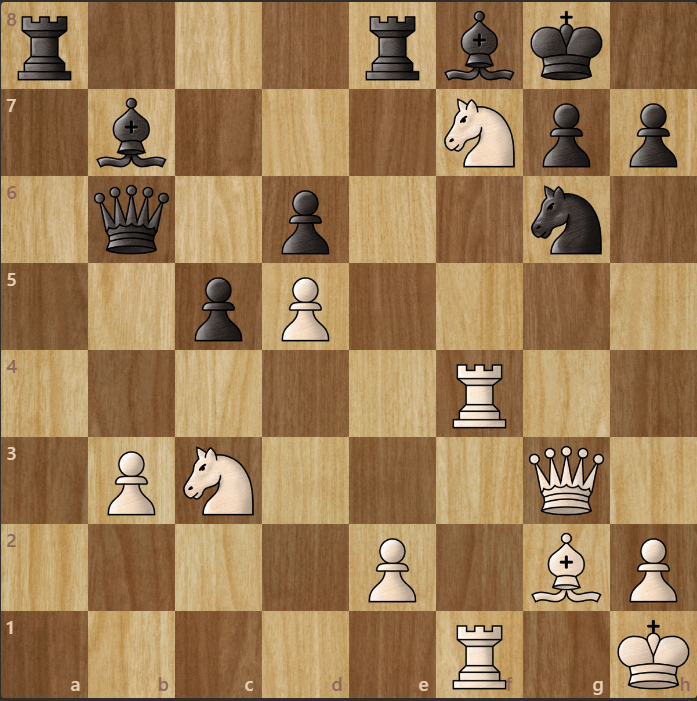
How did Karpov force his way through? With the amazing queen sacrifice Qxg6!!
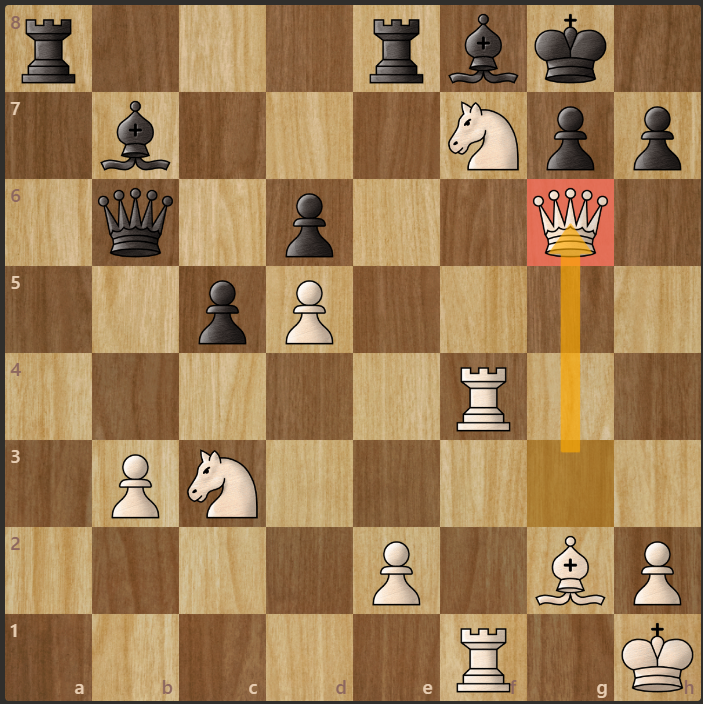
If Black does not take the queen, then he has just lost a piece for nothing. But if Black takes the queen with …hxg6, then it’s going to be game over after White plays Rh4. There is the unstoppable threat of Rh8# next move: an Arabian mate!
Rather than see this sequence play out on the board, Black resigned after Qxg6.
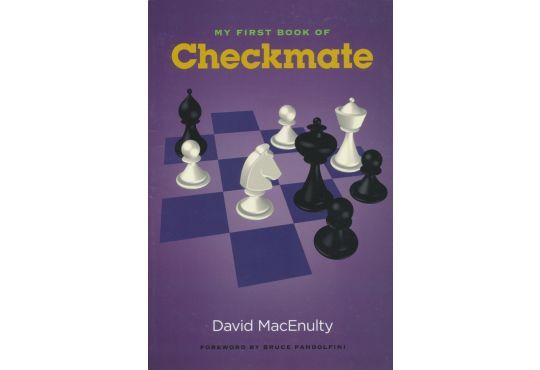
Related: Looking for more checkmating patterns? Check out My First Book of Checkmate, available from the USCF store.
Smothered Mate
A lone knight can checkmate the enemy king if the king has the misfortune of being hemmed in (or “smothered”) by too many of its own pieces.
Gioachino Greco provided a game in his 1620 manuscript which ended with the smothered mate depicted below:
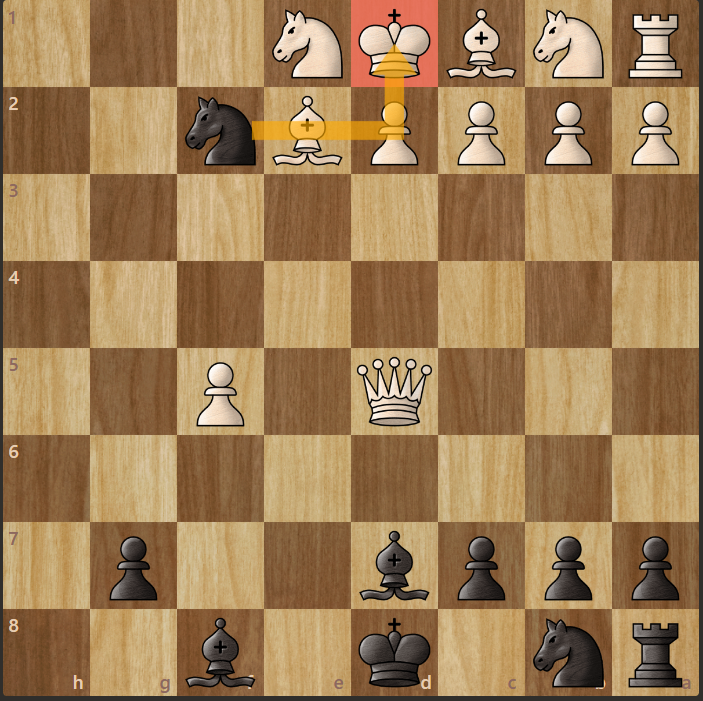
It is not known for certain whether the games Greco included in his manuscript were real. All of the “games” were against anonymous opponents, so it is possible that Greco simply invented them. However, smothered mate definitely occurs in practice!
The below position occurred in Adams vs. Kotronias, 1993, with White to move.
White played Nf7+. White’s intention was not to win the Black rook on d8 due to the fork. Rather, his idea was to begin a sequence that would end in a smothered mate. After Black plays the forced …Kg8, White planned to unleash a double-check with Nh6+!

If Black’s king were to step to f8, then it would be mate in one via Qf7#.
But after the only other legal move …Kh8, White has the amazing sacrifice Qg8+! This pattern is quite well-known to advanced chess players, which explains why Black resigned before White played it.

White’s queen must be captured. It cannot be taken by the Black king, as White’s knight on h6 prevents that. However, taking with either the knight or the rook results in smothered mate thanks to Nf7# - as illustrated below. A beautiful checkmate pattern, and one well worth remembering!
Anastasia’s Mate
Rounding out our tour of checkmate patterns is one which gets its name from a German language novel titled Anastasia und das Schachspiel (Anastasia and the Game of Chess).

An example is shown below, where White’s rook attacks the Black king along the h-file, while the knight covers the g6 and g8 squares. Black’s king has nowhere to go, so it’s checkmate.
Armed with this information, you may be able to predict how White finished off the game in Lasker vs. Fortuin Harreman, 1908, with White to move.
If you found Qxh7+! then well done. It sets up a textbook example of Anastasia’s mate.
Black has only two choices: either take the queen with …Kxh7 or resign. Black actually allowed himself to be checkmated, once White played Rh4# next move.

Summary: How To Checkmate In Your Games
This article has provided an introduction to some of the most common checkmate patterns.
Beyond this, the best way to get better at spotting checkmates in your own games is to make checkmate calculation part of your chess training routine.
An excellent resource to learn and practice all of the checkmate patterns is The Checkmate Patterns Manual, available from the USCF store.
This book expands upon the checkmate patterns we have explored in this article, and introduces plenty more, including:
- Damiano’s Mate
- Max Lange’s Mate
- Boden’s Mate
- Blackburne’s Mate
- Epaulette Mate
- … and many others!
Once you have studied the entire collection contained in The Checkmate Patterns Manual, you will truly be a checkmating pro!
As a side-benefit, you will also improve your ability to calculate deep tactical sequences - a skill which will serve you well in all areas of the game.
Frequently Asked Questions
Checkmate is the situation in chess where a king is attacked and is unable to escape. Whichever player can checkmate their opponent’s king wins the game.
You will checkmate your opponents more often if you study the patterns that lead to checkmate. One of the best books for this is The Checkmate Patterns Manual, which is available for purchase from the USCF store.
The fastest checkmate in chess is just two moves - known as the “Fool’s Mate”. Black can checkmate White after the following moves (or similar): 1. f3 e6 2. g4 Qh4#. The Black queen attacks the White king along the e1-h4 diagonal, which due to White’s opening moves is open for Black to exploit.